Restoration repair is an important skill that can bring old items back to life. Whether it’s furniture, metal objects, or fabrics, understanding the basics of restoration can help you preserve valuable pieces. This guide will provide essential techniques, tips, and tools needed for successful restoration projects.
Key Takeaways
- Restoration repair helps save and renew old items.
- Knowing the right tools and materials is key to a successful project.
- Different materials like wood, metal, and fabric need special care.
- Planning your project can save time and money.
- Always prioritize safety and use proper gear when restoring.
Understanding the Basics of Restoration Repair
Restoration repair is all about bringing back the beauty and function of items that have seen better days. It involves careful techniques and knowledge to ensure that the original charm is preserved while making necessary improvements.
Defining Restoration Repair
Restoration repair refers to the process of fixing and renewing items, whether they are furniture, buildings, or other objects. The goal is to restore them to their former glory, often using methods that respect the original materials and craftsmanship.
Common Types of Restoration Projects
There are many types of restoration projects, including:
- Furniture Restoration: Fixing and renewing old furniture.
- Building Restoration: Repairing historical buildings to maintain their original look.
- Art Restoration: Preserving and repairing artworks to keep them intact.
Key Principles in Restoration Repair
When undertaking restoration repair, it’s important to follow some key principles:
- Respect Originality: Always try to keep the original materials and design.
- Use Appropriate Techniques: Choose methods that suit the item being restored.
- Document the Process: Keep records of what was done for future reference.
Restoration repair is not just about fixing; it’s about honoring the past while ensuring the future of cherished items.
In summary, understanding the basics of restoration repair helps you appreciate the effort and skill involved in bringing old items back to life. Whether it’s a family heirloom or a historical building, each project tells a story worth preserving.
Essential Tools and Materials for Restoration Repair
When diving into restoration repair, having the right tools and materials is crucial. These essentials can make or break your project. Here’s a breakdown of what you’ll need:
Must-Have Tools for Every Restorer
- Screwdrivers: For removing and tightening screws.
- Hammers: Useful for driving nails and assembling pieces.
- Pliers: Great for gripping and bending materials.
- Clamps: To hold pieces together while glue dries.
- Paintbrushes: For applying finishes and paints.
Selecting the Right Materials
Choosing the right materials is just as important as having the right tools. Here are some common materials you might need:
- Wood filler: To repair dents and scratches.
- Wood glue: For fixing joints and cracks.
- Sandpaper: To smooth surfaces before finishing.
| Material | Purpose |
|---|---|
| Wood Filler | Repairing scratches and dents |
| Wood Glue | Joining pieces together |
| Sandpaper | Smoothing surfaces |
Safety Gear and Precautions
Safety should always come first. Here are some essential safety items:
- Safety goggles: To protect your eyes from dust and debris.
- Dust masks: To avoid inhaling harmful particles.
- Gloves: To protect your hands from sharp tools and chemicals.
Always remember, taking the right precautions can prevent accidents and injuries.
By gathering these tools and materials, you’ll be well-prepared to tackle any restoration project with confidence!
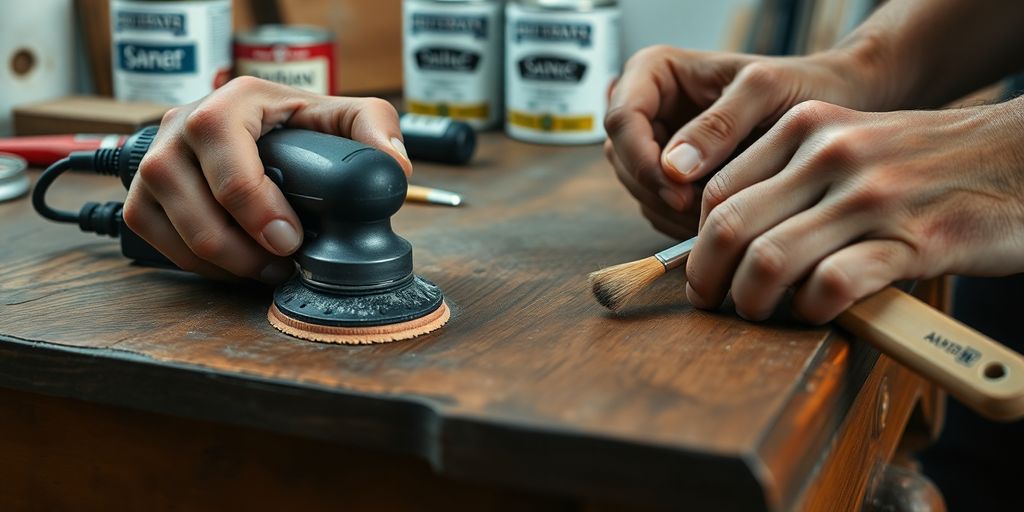
Techniques for Wood Restoration Repair
Identifying Wood Damage
To start any wood restoration project, it’s crucial to identify the type of damage present. Common issues include:
- Surface scratches
- Deep gouges
- Water stains
- Insect damage
Restoring Antique Furniture
When working on antique furniture, follow these steps:
- Clean the surface gently with a soft cloth.
- Use wood filler for minor scratches and dents.
- For deeper damage, consider sanding down the area and applying a matching stain.
Remember, minor surface damage can usually be fixed with sanding and wood filler, while more severe damage may require more advanced techniques. For example, deep gouges can be repaired by filling them with epoxy resin.
Finishing and Sealing Wood Surfaces
After restoration, it’s important to protect the wood. Here are some finishing options:
- Varnish
- Oil
- Wax
Each option has its benefits, so choose based on the desired look and durability.
Proper finishing not only enhances the appearance but also extends the life of the wood.
By following these techniques, you can effectively restore wood items and keep them looking great for years to come!
Approaches to Metal Restoration Repair
Cleaning and Polishing Metal Surfaces
To start restoring metal items, the first step is to clean them thoroughly. Removing dirt and grime is essential for a successful restoration. Here are some common methods:
- Use a soft cloth and mild soap for light cleaning.
- For tougher stains, try a mixture of vinegar and water.
- For polishing, use a metal polish that suits the type of metal you are working with.
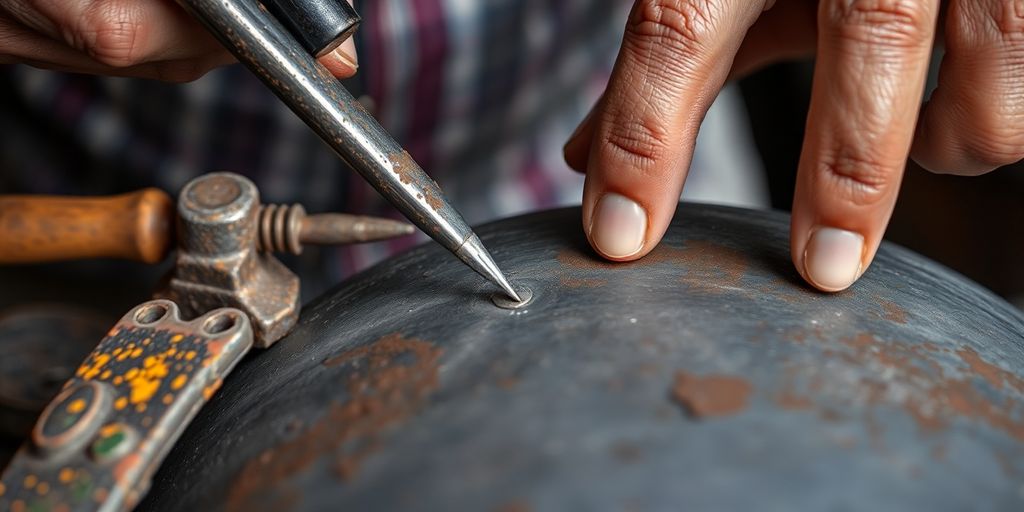
Repairing Rust and Corrosion
Rust can be a major issue for metal items. To fix rust, follow these steps:
- Identify the rusted areas.
- Use sandpaper or a wire brush to remove the rust.
- Apply a rust-inhibiting primer before painting or sealing the metal.
Corrosion can also weaken metal, so it’s important to address it quickly. Regular maintenance can help prevent these issues.
Protective Coatings for Metal
After restoring metal surfaces, applying a protective coating is crucial. This helps to keep the metal safe from future damage. Here are some options:
- Clear sealants for a natural look.
- Paint for added color and protection.
- Wax for a shiny finish.
Protecting your restored metal items is key to ensuring their longevity. Regular checks and maintenance can help keep them in great shape.
In summary, metal restoration involves cleaning, repairing rust, and applying protective coatings. By following these steps, you can ensure your metal items remain beautiful and functional for years to come. Remember, regular maintenance is essential to prevent future damage.
Strategies for Stone and Masonry Restoration Repair
Assessing Stone Damage
To begin any restoration project, it’s crucial to evaluate the extent of the damage. Look for cracks, discoloration, or crumbling. Here are some steps to follow:
- Inspect the surface closely.
- Identify any loose stones or bricks.
- Check for signs of moisture or mold.
Techniques for Masonry Repair
Once you understand the damage, you can choose the right repair methods. Common techniques include:
- Repointing: This involves removing old mortar and replacing it with new.
- Patch Repair: Filling in cracks with a suitable material.
- Stone Replacement: If a stone is too damaged, it may need to be replaced entirely.
Preserving Historical Stonework
When working on older structures, it’s important to maintain their historical value. Here are some tips:
- Use materials that match the original as closely as possible.
- Avoid harsh chemicals that can damage the stone.
- Consult with experts in historical restoration to ensure authenticity.
Remember, restoration is not just about fixing; it’s about preserving the heritage of the structure. Proper techniques can extend the life of your masonry work.
In summary, understanding the damage, applying the right techniques, and preserving history are key to successful stone and masonry restoration. Always prioritize safety and quality in your projects.
Highlight: 100% efficient water damage restoration & repair services
Restoration Repair for Textiles and Fabrics
Understanding Fabric Deterioration
Textiles can wear out over time due to various factors like sunlight, moisture, and general use. Recognizing the signs of damage early can save your fabric from further deterioration. Common issues include fading, fraying, and mold growth.
Repairing Tears and Holes
When you find a tear or hole in your fabric, it’s important to act quickly. Here are some basic steps to follow:
- Assess the damage: Look at how big the tear is and if the fabric is still strong around it.
- Choose your method: You can use hand-stitching or fabric glue, depending on the size of the tear.
- Stitch it up: Mastering basic hand-stitching methods is crucial for successful fabric repair. The running stitch, backstitch, and whipstitch are three fundamental techniques to consider.
Conservation Techniques for Textiles
To keep your textiles in good shape, consider these tips:
- Store fabrics in a cool, dry place to prevent mold.
- Use acid-free materials for storage to avoid damage.
- Regularly check for signs of wear and tear to catch issues early.
Taking care of your textiles not only preserves their beauty but also extends their life.
By following these guidelines, you can effectively manage and repair your textiles, ensuring they remain a cherished part of your home.
Advanced Tips for Successful Restoration Repair Projects
Planning and Budgeting Your Project
When starting a restoration project, planning is key. Here are some steps to help you budget effectively:
- Assess the scope of your project.
- Gather estimates for materials and labor.
- Set aside a contingency fund for unexpected costs.
Working with Restoration Professionals
Sometimes, it’s best to call in the experts. Here are some tips for working with restoration professionals:
- Do your research to find qualified restorers.
- Ask for references and check their previous work.
- Discuss your vision and expectations clearly.
Maintaining Restored Items
Once your project is complete, proper maintenance is crucial. Consider these tips:
- Regularly clean and inspect restored items.
- Use appropriate products for cleaning and care.
- Store items in a safe environment to prevent damage.
Remember, successful restoration is not just about fixing things; it’s about preserving their history and value.
In summary, following these advanced tips can help ensure your restoration projects are successful and rewarding. By planning carefully, collaborating with professionals, and maintaining your restored items, you can enjoy the fruits of your labor for years to come.
Restoration is a journey, and every step counts!
When tackling restoration and repair projects, having the right tips can make all the difference. For expert advice and to learn more about how we can help you with your restoration needs, visit our website today!
Conclusion
In conclusion, restoration repair is a rewarding journey that can bring new life to old items. By using the right techniques and tips, anyone can tackle a project, no matter how big or small. Remember to take your time, be patient, and enjoy the process. With practice, you’ll get better and more confident in your skills. So gather your tools, start your next project, and watch as you transform something worn into something wonderful!
Frequently Asked Questions
What is restoration repair?
Restoration repair is the process of fixing and renewing items to bring them back to their original state. This can include furniture, metals, fabrics, and more.
What tools do I need for restoration projects?
You will need some basic tools like screwdrivers, hammers, sandpaper, and brushes. Depending on the project, you might also need special tools.
Can I restore old furniture myself?
Yes, many people can restore old furniture on their own! With the right tools and techniques, you can fix and refresh your furniture.
How do I know what materials to use?
Choosing the right materials depends on what you’re restoring. Always look for materials that match the original item and are suitable for the repair.
What safety gear should I wear while restoring?
It’s important to wear safety gear like gloves, goggles, and masks to protect yourself from dust and chemicals during restoration.
How can I maintain my restored items?
To keep your restored items looking good, clean them regularly and store them properly. Avoid direct sunlight and extreme temperatures.